How do I add appointment scheduling to my website in 1 minute; Hupport is the newest innovations in online appointment scheduling software. It is the best online appointment and booking software that is available now.
The steps below show how you can add Hupport appointment software or any other appointment scheduling software to your website.
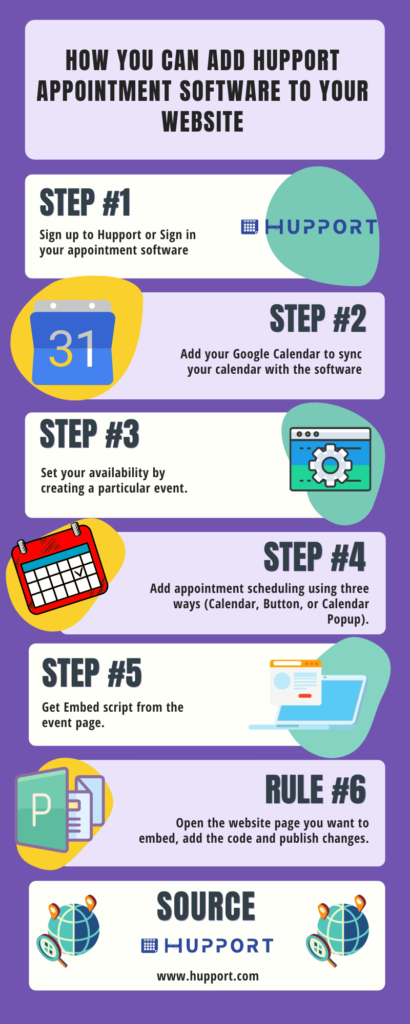
How do I add appointment scheduling to my website in 1 minute
- Sign up to Hupport or Sign in your appointment software
- Add your Google Calendar to sync your calendar with the software
- Set your availability by creating a particular event. E.g: If you offer 30 min-consultation, create an event with 30 min meeting, set your availability based on day and time.
- Add appointment scheduling using three ways (Calendar, Button, or Calendar Popup).
- Get Embed script from the event page.
- Open the website page you want to embed, add the code and publish changes.
After doing all these, you will then have the appointment scheduling on your website.
Why use Hupport for appointment scheduling
Minimizing booking errors
Hupport helps to minimize booking errors by automating all scheduling and booking activities. It eliminates back and forth emails that are bewildered with the manual method of booking appointments. Clients can book appointments by going online to check through your schedules and book the slots that they prefer. All scheduling and booking settings are all done within the system. This online automation ensures high level of accuracy, thereby eliminating or minimizing all booking errors.
Time efficiency
Hupport ensures time efficiency by making appointment scheduling and bookings as fast as possible. Clients can schedule and book appointments within a few minutes with ease. Clients don’t have to walk a distance to office locations to book appointments. Clients can book appointments using their smartphones from the comfort of their homes and from any location. Multiple people can book appointments at the same time.
It reduces no-shows
Hupport helps to reduce or eliminate no-shows by sending reminder emails or SMS to clients who are booked for upcoming appointments. You can set the system to send reminder emails and SMS to clients who book appointments with you. Appointment reminders will be sent periodically when already booked appointments are fast approaching. Sending reminders keep clients reminded of upcoming appointments so that they don’t forget to keep their appointments. Sending reminder emails and SMS help to reduce or totally eliminate no-shows by ensuring that clients shows-up for their appointments.
It is a convenient way of booking appointments
Hupport is an extremely convenient tool to book appointments. Clients can conveniently book appointments right from the comfort of their homes. Appointments can be booked with ease. Clients can book appointments at any time without any time restrictions.
Increased revenue
Hupport helps to increase revenue by increasing the number of clients that can book appointments. Clients are more satisfied with an efficient appointment booking platform like Hupport. It helps you to acquire new clients and retain already existing clients. Also, you don’t need to spend a huge amount of money to hire staff that will take care of appointment scheduling and bookings. Using Hupport help you save the cost of hiring staff, hence providing more revenue for your business.
Features of Hupport appointment scheduling software
Features of Hupport appointment scheduling software
The features of Hupport include:
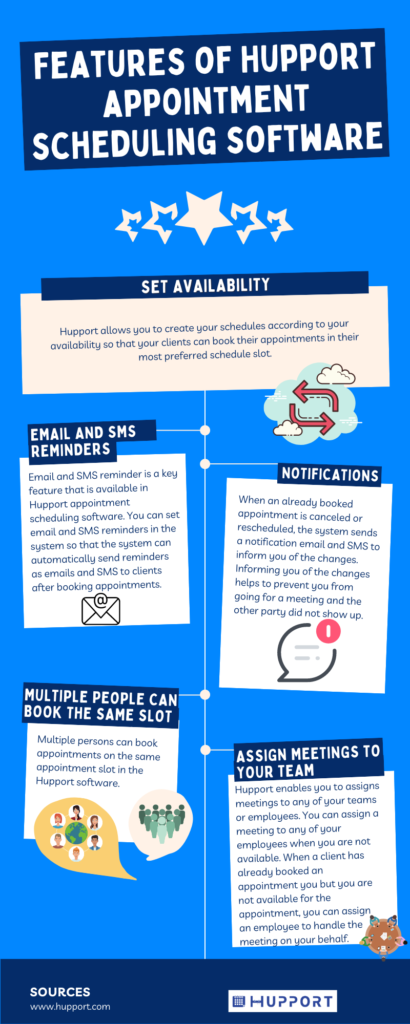
Set availability
Hupport allows you to create your schedules according to your availability so that your clients can book their appointments in their most preferred schedule slot. You can create different appointment slots and your clients can choose which of the available slots is convenient for them. After creating your schedules, you can share your schedule link directly with your clients so that your clients can choose which schedule slots they prefer. You can as well embed the booking page of Hupport into your business website or Facebook page. Your clients will be able to access your schedule page and book their appointments via your website and Facebook page.
Email and SMS Reminders
Email and SMS reminder is a key feature that is available in Hupport appointment scheduling software. You can set email and SMS reminders in the system so that the system can automatically send reminders as emails and SMS to clients after booking appointments. Reminders are sent periodically by the system to clients who are booked for appointments to remind them of their upcoming appointments. Emails and SMS reminders ensure that clients do not forget about their appointments so that they will keep to their appointments.
Notifications
When an already booked appointment is canceled or rescheduled, the system sends a notification email and SMS to inform you of the changes.
Informing you of the changes helps to prevent you from going for a meeting and the other party did not show up.
Multiple people can book the same slot
Multiple persons can book appointments on the same appointment slot in the Hupport software. You can create a slot that different clients can book appointments to attend the same meeting. This is important when you want to conduct a group meeting, webinar, workshop, or seminar. It allows you to have a group meeting with different people at the same time.
Assign meetings to your team
Hupport enables you to assigns meetings to any of your teams or employees. You can assign a meeting to any of your employees when you are not available. When a client has already booked an appointment you but you are not available for the appointment, you can assign an employee to handle the meeting on your behalf.
Record-keeping and reporting
Hupport stores and keep records of all booking activities at a specific period of time. It keeps the record of all booking activities safely secured. All booking reports can be exported to excel sheet.
Team pages
A team page is a page that contains different topics, events, and employees. Clients can book appointments with any of the topics, events, or employees according to their interests.
Integrations
Hupport can be integrated with third-party calendars such as Google, Outlook, or Office 356 calendars. When an appointment is booked, it is automatically added to your personal calendar and synced with the other calendars. Syncing with other calendars helps to prevent double bookings.
Payment channel
Hupport support integrations from third-party payment solutions such as PayPal or Stripe. It allows you to receive direct payment from your clients via PayPal or Stripe. Clients can make payments when booking appointments.
Appointment reminder by Email/Text/Voice Drop
Appointment reminder by Email/Text/Voice Drop is a feature of Hupport that reminds clients about upcoming appointments. The system sends automated emails, text, or voice messages to clients to remind them that already booked appointments are fast approaching. This ensures that clients are duly reminded of appointments that they have booked and also ensure that they show up for their appointments.
How to Add Appointment scheduling to WordPress website
To add an appointment scheduling software to your website, first;
- Follow steps the mentioned above from 1-5 above
- Go to “Yourdomain.com/wp-admin”
- Login your WordPress
- Go to Pages and click “Add New”
- Create a new page in your WordPress and copy-paste the exact script in your page and click “Publish”
Adding Appointment scheduling to WIX website
Follow the steps below to add an appointment scheduling software to WIX website
- Go to Settings in your site’s dashboard.
- Under Advanced Settings, click the Tracking & Analytics tab
- Click “+ New Tool” and select “Custom” from the dropdown.
- Set up your custom code. Follow the steps below to set up custom code
- Enter your custom code.
- Select the relevant domain (This will only appear if you have multiple domains).
- Enter a name for your custom code.
- Add Code to Pages: Select which pages to add your code to:
- To add code to All Pages:
- Click the dropdown to select an option and choose:
- Load code once, or
- Load code on each new page.
To add code to specific pages, click specific pages: Then, begin to type the name of the relevant pages and click the checkbox next to the relevant page.
5. Place the Code in by first selecting where the code snippet should be placed in your site’s code:
Select “Head” to place the code at the head
Select “Body” to place at the start
Select “Body” to place at the end
6. Click “Apply” to save the process.
How to Add Appointment scheduling to Joomla WEBSITE
Follow the steps below:
- Go to your Administrator screen and click on “Site”
- Click on “Global Configuration”
- Set “Default WYSIWYG Editor” to “Editor – No Editor” and click Save
- Make sure you have your editor turned off as in the previous section and then go to “Extensions”
- Click on “Module Manager” and click “New”.
- Choose “Custom HTML” from the dropdown
After clicking “Custom HTML, there are three things you need to do inside the module:
- Name the module
- Set “Show Title” to No.
- Put your cursor in the “Position” box and click the back button. You’ll then be able to create your own position and name it.
7. Enter your embed code just as you did in the earlier section
8. Click “Save” to complete the process.
9. Go back to Site, click “Global Configuration” and choose “Editor – TinyMCE” to turn your editor back on.
After doing this, your editor is kept on when you go to any article. Use whatever you entered in the “Position” field when creating your module.
How to Add Appointment scheduling to SQUARESPACE website
Follow the steps below to add an Embed Block:
- To edit a page or post, click on “insert point”, and select “Embed” from the menu.
- Enter the URL of the item you’re embedding.
- To add or edit the embed code manually, you can click the </> icon in the URL field
- Click Apply to save the process.