Calendly WordPress Plugin Alternative and How to embed Calendly calendar in WordPress pages: When you have huge traffic on your website, adding a scheduling or an appointment booking form is a great way to easily convert them by making appointment bookings very easy and fast for your website visitors.
Calendly WordPress plugin allows you to add Calendly scheduling pages directly to your WordPress website so that visitors can schedule and book appointments on your WordPress website through Calendly.
There are other better alternatives to Calendly WordPress plugin. If you’re not satisfied with Calendly and you’re searching for better alternatives, we are going to look at some top best alternatives to Calendly WordPress plugin that can help you to be more efficient and effective with your booking and scheduling activities.
Hupport appointment scheduler
Hupport appointment scheduler is a great alternative to Calendly. It is an easy and elegant appointment booking tool that is built specifically for WordPress to allow scheduling and booking appointments on your WordPress website.
It has a fast and easy booking process for WordPress users. It allows you to automatically link booked clients with their WordPress accounts. With the auto-fill feature, the details of your clients such as their names and emails are automatically filled in for a faster and easier booking process.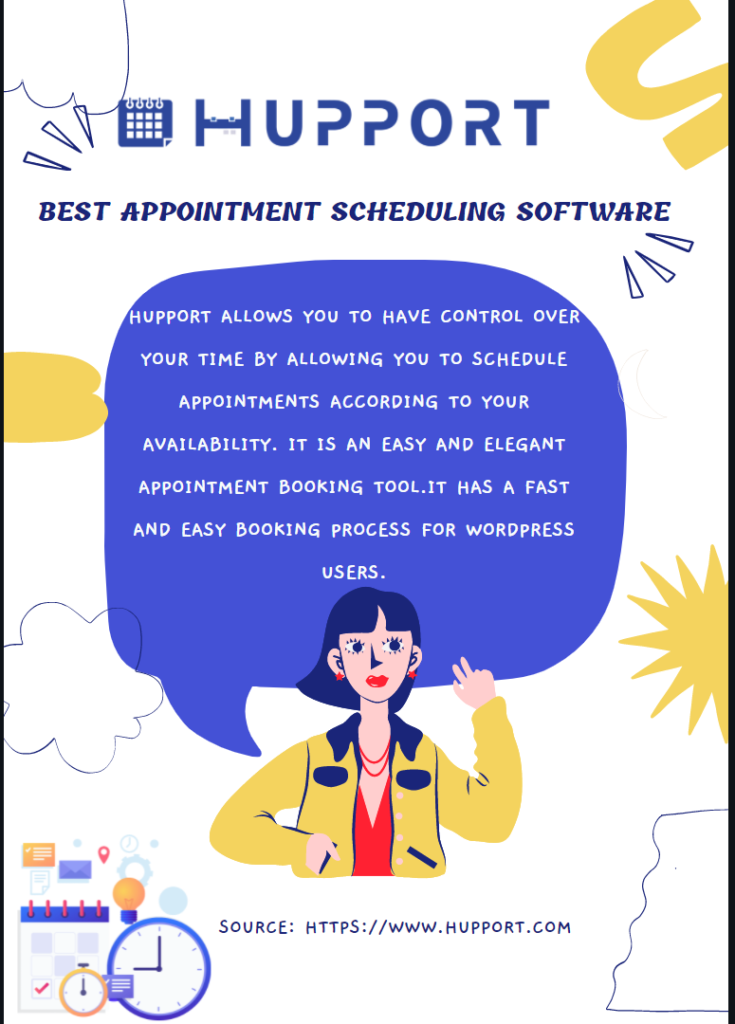
Hupport WordPress plugin has a built-in control to style and customize your website. With Hupport appointment scheduler, you can easily customize or style your booking form to match your website or brand. You will have total control over the look or appearance of your booking form.
Embedding Hupport appointment scheduler right on your website enables you to connect with your website visitors and easily convert them.
WPCAL
WPCAL is another great alternative to Calendly. You can easily integrate WPCAL into your WordPress website so that website visitors can directly book appointments on your WordPress website. WPCAL is easy to set up and use. You can schedule meetings within 30 seconds and your website visitors can book meetings in even a shorter time.
You can easily set up your availability so that your website visitors can know when you’re available for appointments. They can choose a convenient date and time for their bookings. By embedding your scheduling and booking form into your website, you make it readily available for your website visitors. They can book appointments at any time of the day or night.
You can control the duration of each meeting, set a limit to the number of bookings you want per day, prevent last-minute bookings, and set other variables or controls for your bookings and meetings.
Amelia
Amelia is a simple, yet powerful automated booking tool. It is an appointment WordPress booking plugin that allows you to embed your scheduling and booking page on your WordPress website so that your customers can book appointments on your website at any time.
Amelia allows you to provide an enterprise-level smooth booking experience for your customers. Amelia WordPress booking plugin fully automates your interaction with your website visitors. You can communicate with potential customers and easily convert them into active customers by providing them with what they want.
Installing and configuring Amelia is very easy and takes only a few clicks. Most actions on Amelia do not require more than 2-3 clicks. In case you need help when installing and configuring, Amelia has detailed documentation on plugin functionalities. It also has an effective customer support staff that are always ready to support and guide you.
SimplyBook.me
SimplyBook.me is another great alternative to Calendly. You can create a free SimplyBook.me account. Key benefits of using SimplyBook.me include notifications via SMS or email, accepting and managing online bookings, accepting payments through Stripe, PayPal, and so on. It has booking widgets for Facebook, WordPress and other CMS systems.
10to8
10to8 has more advanced features than Calendly. It is an all-in-one solution for bookings and calendar management.
You can embed its scheduling and booking page on your WordPress website so that you can communicate with your website visitors on many different levels. All conversations with potential customers will be displayed directly in your calendar so you don’t have to waste time searching for specific parts of the conversation.
Other useful features of 10to8 include Group Meetings, SMS & Email Reminders, and Integrations with over 500 apps, Online Payments, Live Reports, Calendar Sync, and more.
How to Embed Calendly Calendar in WordPress Pages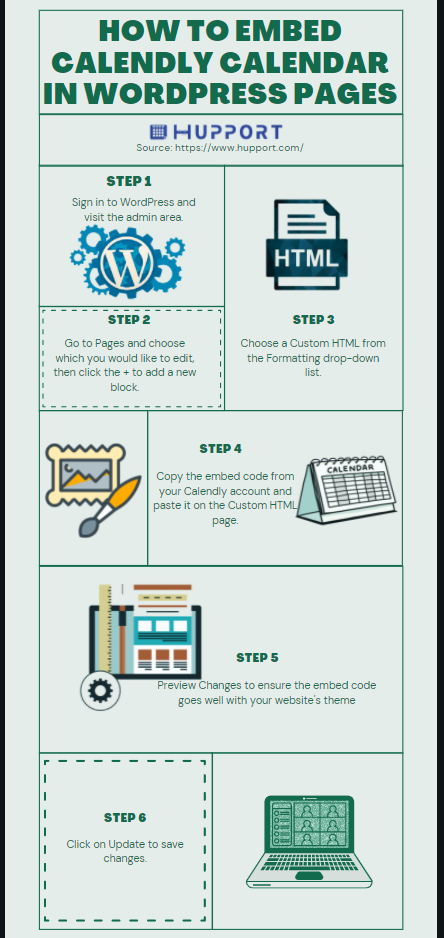
To embed Calendly on a single page of your WordPress site, follow the steps below:
Step 1:
Sign in to WordPress and visit the admin area.
Step 2:
Go to Pages and choose which you would like to edit, then click the + to add a new block.
Step 3:
Choose a Custom HTML from the Formatting drop-down list.
Step 4:
Copy the embed code from your Calendly account and paste it on the Custom HTML page.
Step 5:
Preview Changes to ensure the embed code goes well with your website’s theme
Step 6:
Click on Update to save changes.
Top 4 Calendly Embedding Issues
Embedding a scheduling page onto your website is the best way to encourage your website visitors to book appointments with ease.
Calendly has three embed options that you can choose from. You can check from these embed options to know the one that its look and functionalities suit your webpage the most.
Due to the fact that our embed code may perform differently across different host platforms and site themes, there are some common embedding issues that we are providing answers to.
These common issues include:
- How to change the position of the widget?
- How to create your own button?
- How to remove the scroll bar?
- How to make your mobile schedule fullscreen?
How to change the position of the widget?
When you are using our pop-up widget embed code, the default position that you need to place the widget is at the bottom of the webpage aligned to the right side corner.
Add one of the CSS codes below to change the alignment to either the left or center of your page and then adjust the left and right inputs until you arrive at your desired spacing.
Left:
<!– left align the badge widget –>
<style type=”text/css”>
.calendly-badge-widget {
right: auto !important;
left: 20px !important;
}
</style>
<!– end left align the badge widget –>
Center:
<!– center align the badge widget–>
<style type=”text/css”>
.calendly-badge-widget {
left: 50% !important;
margin-left: -100px!important;
}
</style>
<!–end center align the badge widget–>
How to create your own button?
You can create your own customized button to entice your site visitors to schedule and book appointments with a button that triggers a pop-up scheduler.
When you add the code below somewhere within your web page, it will give you the Calendly CSS and Javascript resources, without the clickable text link:
<!– Calendly link widget begin –>
<link
href=”https://calendly.com/assets/external/widget.css”
rel=”stylesheet”>
<script
src=”https://calendly.com/assets/external/widget.js”
type=”text/javascript”></script>
<!– Calendly link widget end –>
Next, you’ll need to trigger this Javascript code when the button is clicked to initiate the pop-up. To an HTML element, add:
onclick=”Calendly.showPopupWidget(‘YOUR_SCHEDULING_LINK’);
return false;”
Replace the link with your own URL. It could be for your scheduling page or a specific event type.
How to remove the scroll bar?
Your website visitors may encounter a Calendly embed module with a scroll bar depending on the host and theme you’re using for your website. The scroll bar appears when the embed module is more than the size of the container, which is controllable in your site layout.
You can increase the height specified in the code copied from your account if you want to remove the additional scroll bar.
<div class=”calendly-inline-widget”
data-url=”https://calendly.com/YOUR_EVENT”
style=”min-width:320px;height:750px;”></div>
How to make your mobile schedule fullscreen?
If you embedded Calendly on a mobile site and the view is very small, you can make the widget responsive so that the view appears fullscreen on mobile devices by adding the code below to your page’s source code.
<meta name=”viewport” content=”width=device-width, initial-scale=1″>
Does Calendly integrate with WordPress?
Calendly WordPress Plugin: Yes. Calendly can be integrated with WordPress to allow WordPress website visitors to schedule or book appointments.
Does Microsoft have a version of Calendly?
Calendly for Outlook Add-in is designed to allow scheduling a meeting within Microsoft Outlook.
Can I trust Calendly?
Calendly is easy to set up and use. It allows integrations across multiple platforms. You can easily schedule and book appointments with Calendly.
Calendly leverages all of its built-in security, privacy, and redundancy features. All connections from the browser to the Calendly platform are encrypted in transit using TLS SHA-256 with RSA Encryption. You can totally trust Calendly.
How do I integrate Calendly on my website?
Before integrating Calendly on your website, you need to get a Calendly embed code.
How to get a Calendly embed code
The steps below show how to get a Calendly embed code
Step 1:
Click the cog icon in the top-right of your preferred event format from your Calendly dashboard.
Step 2:
Select “Add to Website”.
Step 3:
Choose the “Inline Embed” option and click “Continue”.
Step 4:
Customize your color settings to match your website’s colors.
Step 5:
Click “Copy Code”.
How to add the Calendly code to your Website
Calendly WordPress Plugin: After creating the Calendly embed code, the next thing is to add the code to your website.
The steps below show how to add the Calendly code to your Website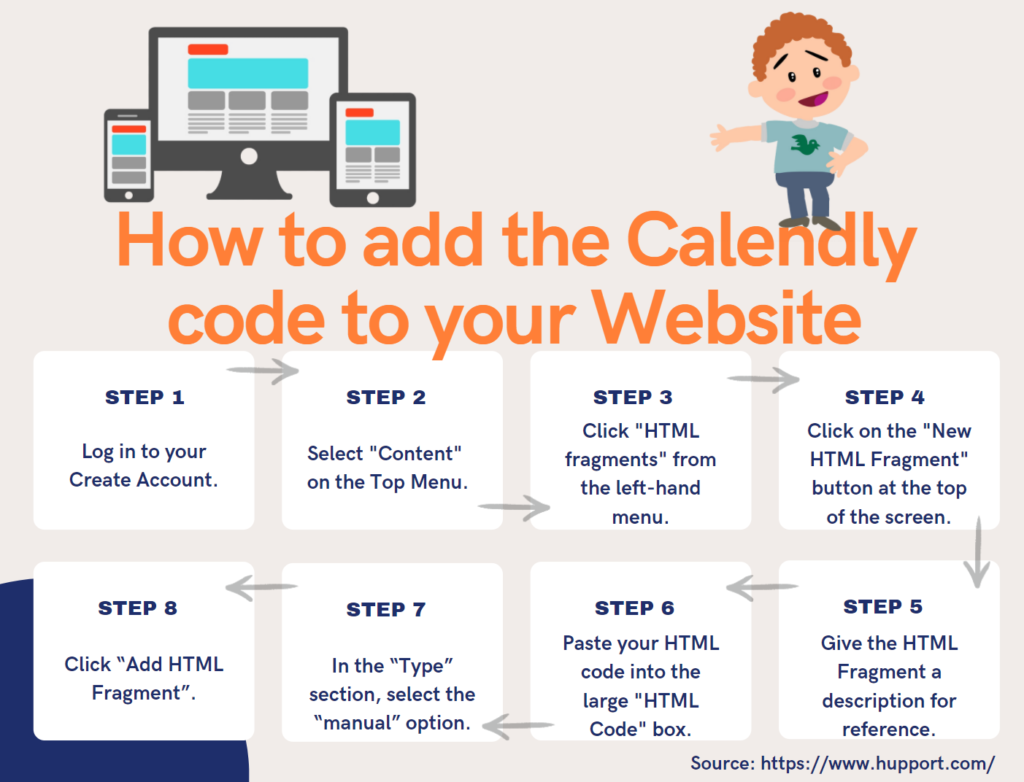
Step 1:
Log in to your Create Account.
Step 2:
Select “Content” on the Top Menu.
Step 3:
Click “HTML fragments” from the left-hand menu.
Step 4:
Click on the “New HTML Fragment” button at the top of the screen.
Step 5:
Give the HTML Fragment a description for reference.
Step 6:
Paste your HTML code into the large “HTML Code” box.
Step 7:
In the “Type” section, select the “manual” option.
Step 8:
Click “Add HTML Fragment”.
How to add your Calendly scheduling calendar to your website page
To make your Calendly scheduling calendar visible for your website visitors, you need to add it to your website page.
The steps below show how to add your Calendly scheduling calendar to your website page:
Step 1:
Select “Content” on the Top Menu.
Step 2:
Go to the page you’d like to add your calendar to and click “Edit This Page”.
Step 3:
Select “Add Block” in the bottom-left of the page (+ icon).
Step 4:
Select “Custom” from the drop-down box and select the “Custom Single Element”. We recommend that you choose the largest Custom Single Element from the bottom of the list.
Step 5:
Move your cursor over the Custom Element Placeholder and click “Add Custom Element”.
Step 6:
Select “HTML Fragment” from the drop-down box and click “Done”.
Step 7:
Move your cursor over the HTML Fragment and click “Settings”.
Step 8:
Choose the HTML Fragment that you created from the drop-down box and click “Done”.
Step 9:
Save your changes and publish your site.
How do I remove Calendly branding?
Follow the steps below to remove Calendly branding from your booking page:
Step 1:
Click on Account Settings from the Account menu at the upper right, and then select Branding.
Step 2:
To add your logo, click Upload Image, select an image, then click Apply.
Step 3:
To remove the Calendly badge or branding logo, Navigate to Calendly Branding and switch the toggle to the left.
Step 4:
Click on Save Changes.