For setting up the SPF settings in your server all you need to follow is the below steps which are as follows:
Stage 1: Collect the IP addresses which are required to send emails
The initial step to actualize SPF is to recognize which mail servers you use to send email from your particular server. Numerous associations send emails from an assortment of locations.
Make a rundown of all your email servers, and make sure to consider whether any of coming up next is utilized to send email for your business brand as Web server, In-office mail server such as Microsoft Exchange, ISP’s email server, The mail server of your final clients’ the provider of mailbox, The email server of the this party which are used to send emails on the behalf of your particular brand.
Stage 2: Build a list of all your sending domains
In the case, if your business is having more than one domain. Whereas some of the domains are utilized to send emails only.
It is imperative to make SPF records for all of your domains for the company. Even for those also which are not used to send emails.
It is because once you have secured your sending domains with the SPF, the main thing a hacker will do is endeavor to spoof of the domains which are not used to send emails.
Stage 3: Then make your SPF record
SPF verifies the identity of the sender by looking at the sending emails server’s IP addresses with the list if the approved or authorized sending IP addresses which are published by your sender into the DNS record. Now follow the stages to make you make SPF record:
Begin with v=spf1 tag and then follow the same with the IP addresses that are approved to send emails. For instance, v=spf1 ip4:1.2.3.4 ip4:2.3.4.5
In the event that you utilize a third party so to send the email on the behalf of the domain being referred to, then you need to add up an “include” explanation in your SPF record to assign that the third party is the legitimate email sender and allow them to send emails.
When you have included all approved or authorized IP addresses and incorporate explanations, end your record with a ~all or – all tag
A ~all tag shows a delicate SPF fail while a – all tag demonstrates a hard SPF fail. According to the significant mailbox suppliers ~all and – all will both outcome in SPF failure. Return Path prescribes a – all as this is one of the most reliable and safe records to maintain.
SPF records can’t be more than 255 characters long and cannot include in excess of ten incorporate proclamations, otherwise called “lookups.” Here’s a case of what your record may resemble:
v=spf1 ip4:1.2.3.4 ip4:2.3.4.5 include: thirdparty.com – all
For the domains that don’t send email, the SPF record will prohibit any modifier except for – all. Here’s a model record for the particular domain which is not used to send emails:
v=spf1 – all
Thus now you are all done, yes your SPF is created now and it’s the final time to publish or test the same.
Stage 4: Now it’s the time to publish the SPF to DNS
Start working with the DNS server controller to distribute your SPF record to your DNS, so that the mailbox suppliers can take a reference from the same.
In the case, if you are utilizing the hosting supplier, such as Godaddy and more than the set process is considered very simple and easy.
In the event that your DNS records are directed by the ISP or in the case if you are not particularly sure about it, then all you need to do is to contact the IT team of your company for getting their support.
Then the Email service suppliers ordinarily distribute or publish the SPF records for the sending domains on your business behalf.
Stage 5: now all done you are all set to test the same
Now at the end, Test the created SPF record with the SPF check device. Then you will see what all your recipients would able to see a list of all the servers, which are authorized or approved to send email in the interest of your sending domain.
In the event that at least one of your authorized or legitimate sending IP addresses isn’t recorded, then you need to refresh your record to incorporate it.
A graphical representation of SPF setup such as:
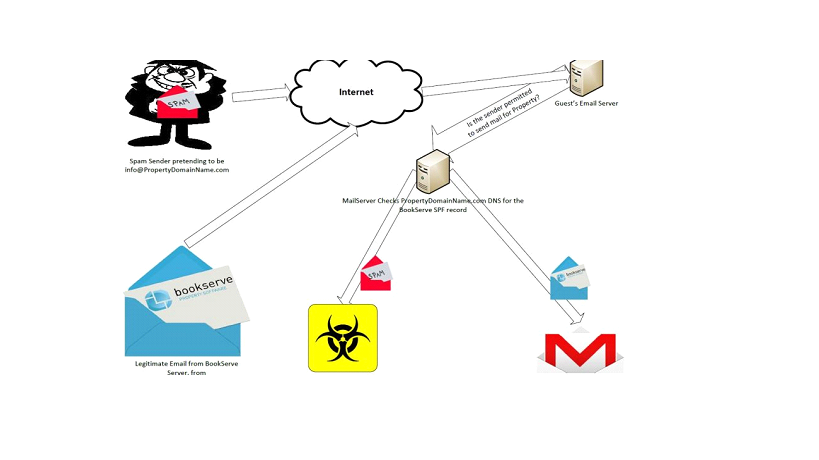
Need for SPF
SPF implies to the Sender Policy Framework which is known as the record is the DNS record that distinguishes particular email servers that are permitted to send emails on the behalf of your particular domain.
SPF records are utilized to keep spammers from spoofing your particular domain name. The recipient servers can utilize the SPF record you distribute in DNS to decide if an email that they have been received has originated from an approved server or not.
They would then be able to settle on a choice about how to treat that email. You can read a more point by point summary of SPF records here. Thus, with the ongoing years, SPF has gone from a “nice to have” to a “must have”.
Regardless of whether they aren’t flawless, they are very viable and are a piece of being a decent email subject on the web. In any case, some email administrators don’t see it that path, regardless of the way that without an SPF record:
• As the Spammers can spoof the particular domain name to spam different systems, which may damage or hurt the reputation of your brand.
• Assailants can also spoof the domain name for phishing and whaling assaults, possibly prompting ransom ware, malware, and any type of monetary loss or extortion.
• Other email servers on the web may dismiss your email since they can’t decide its authenticity.
Thus ensure that all your domains or server must have the SPF records as it helps in preventing the spoofing for you.